Volunteer events can be created to support a single activity, like a gala, race, or golf tournament, or they can be recurring events that happen on a regular basis, like office work, gift shop sales, meal delivery, or tutoring. You will create the event using the Event Pages in the Events Module. This article only covers the specifics related to volunteer events. To learn more about creating events, see this article "How do I create a new event?"
Event Settings Tab
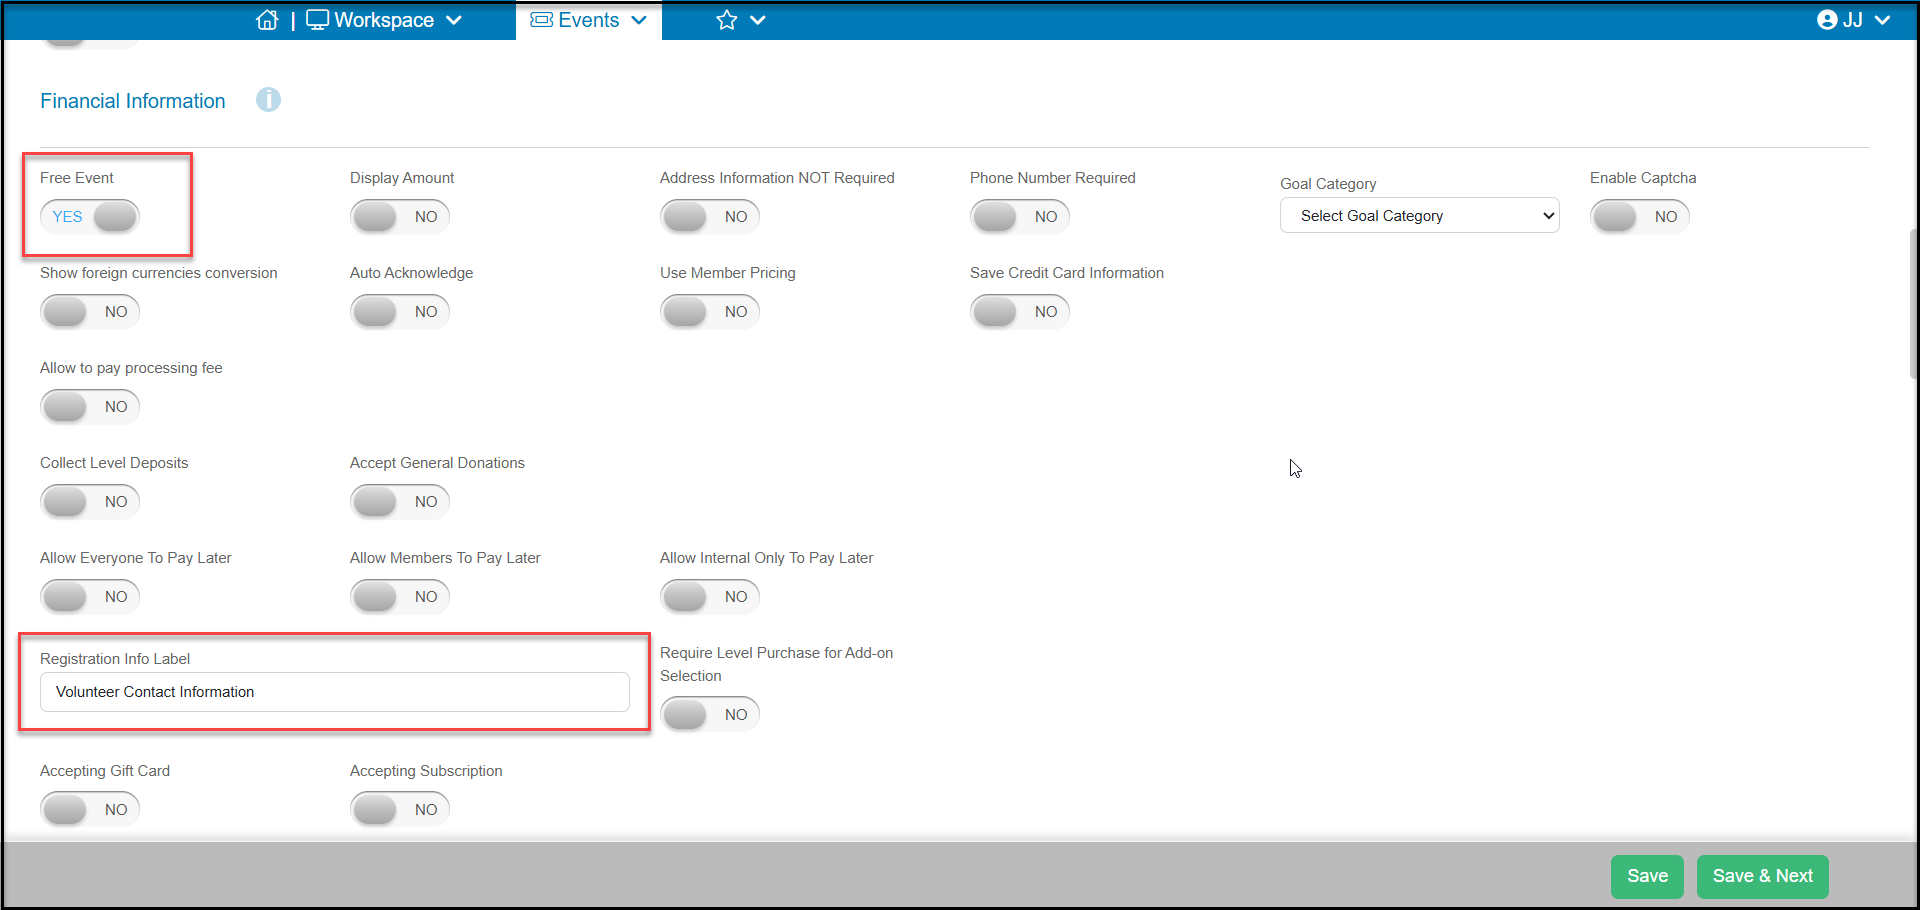
When creating volunteer events, there are a few features on the Event Settings tab particularly related to the Volunteer Module. Be sure you have set the Event Start and Event End Date at the top of the page. Under Financial Information section. Setting Free Event to YES will hide the price field from the Event Levels.
You may also want to relabel the Registration Info Label to indicate this collects the volunteer contact information.
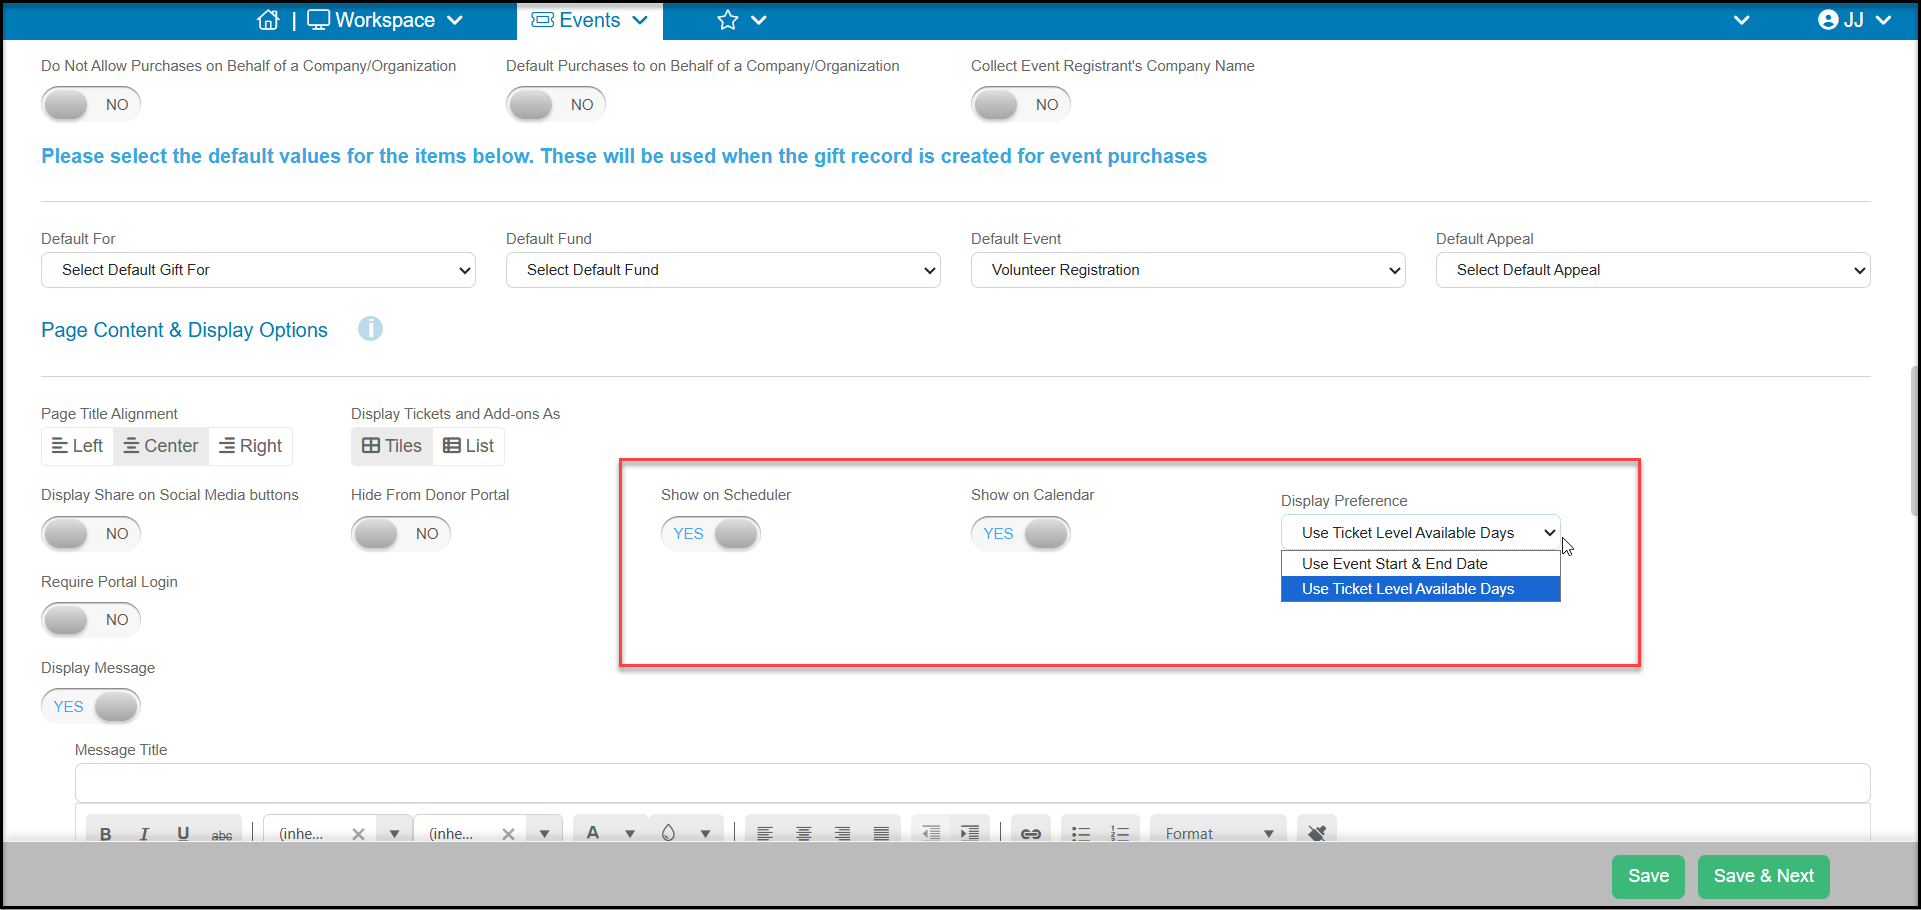
Under the Page Content & Display Options. Set Show on Scheduler to YES allow you to view the registrations on a calendar and perform internal registrations quickly. This field does not affect the way the page looks to the public, it is for internal use only.
If you also share your events calendar and you would like the public to see this event on your calendar, you can set Show on Calendar to YES. Under Display Preference, for single day events, you would choose Use Event Start & End Date. Use Ticket Level Available Days is used for recurring events.
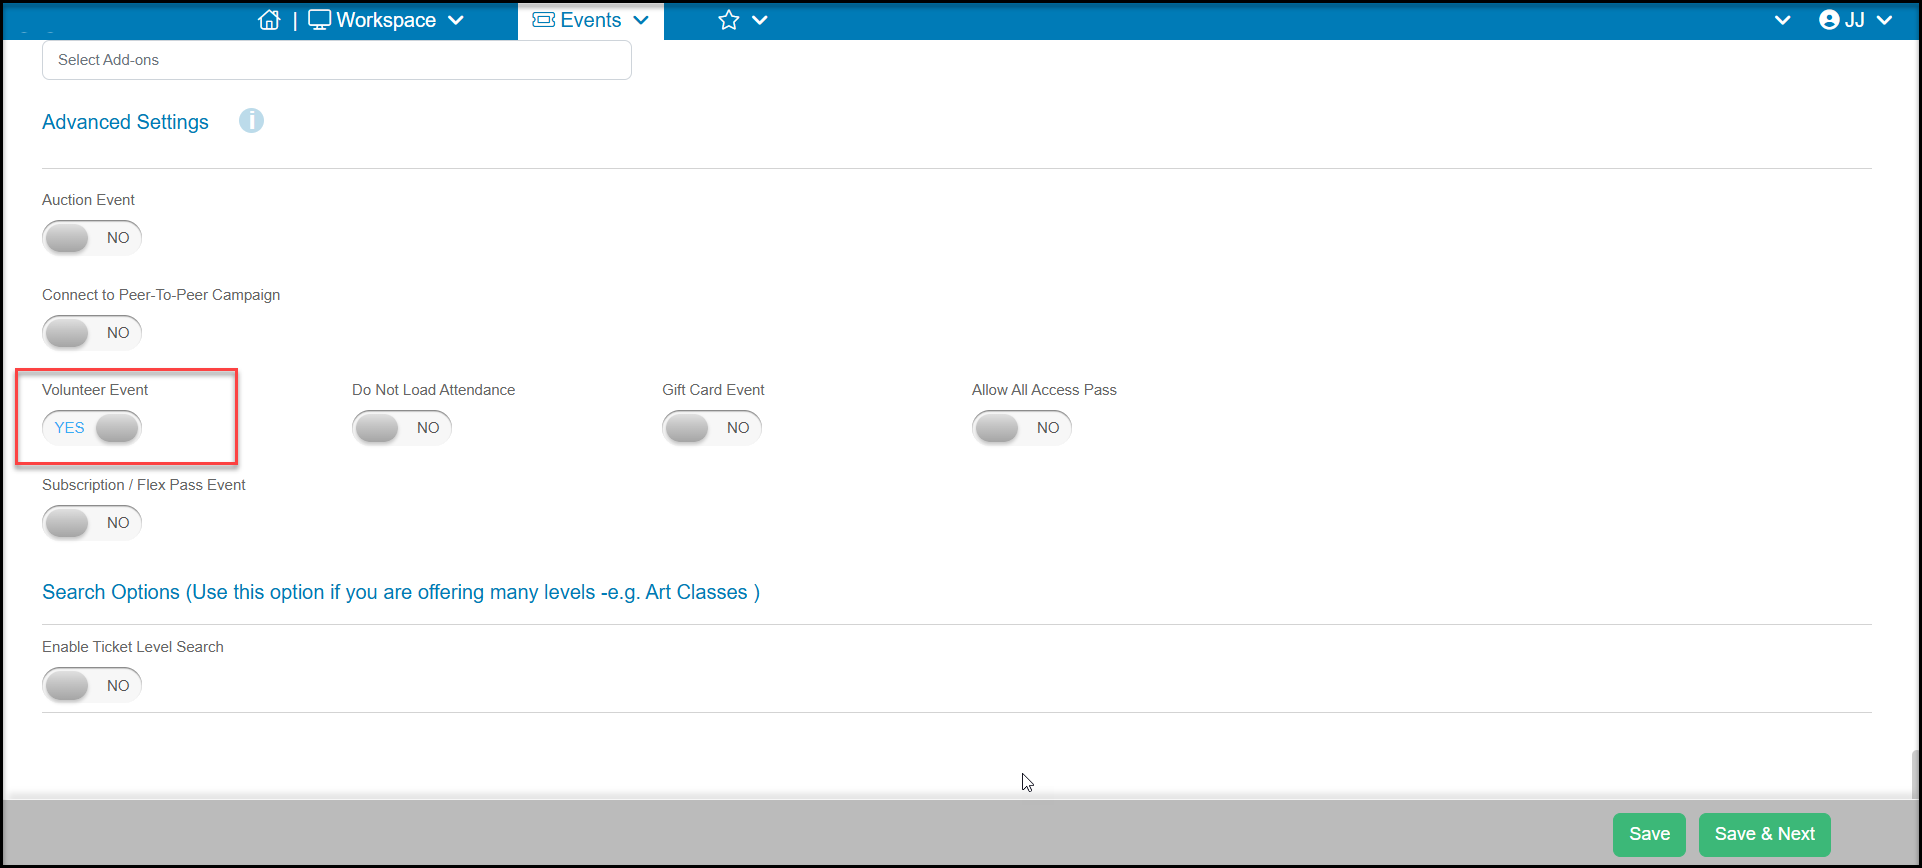
The feature needed to link your event to the Volunteer module is under the Advanced Settings near the bottom of the page. You must set Volunteer Event to YES on your event page in order for the Volunteer Registrations, Attendance and Scheduler pages to show your volunteer event. If this toggle is left as NO, you will not see this event as an option to track in the Volunteer Module, however it would still be visible in the Events Module.
This setting also does not affect the way the page looks to the public, it is for internal use only.
Be sure to click Save or Save & Next to save those changes.
Event Setup Tab - Levels
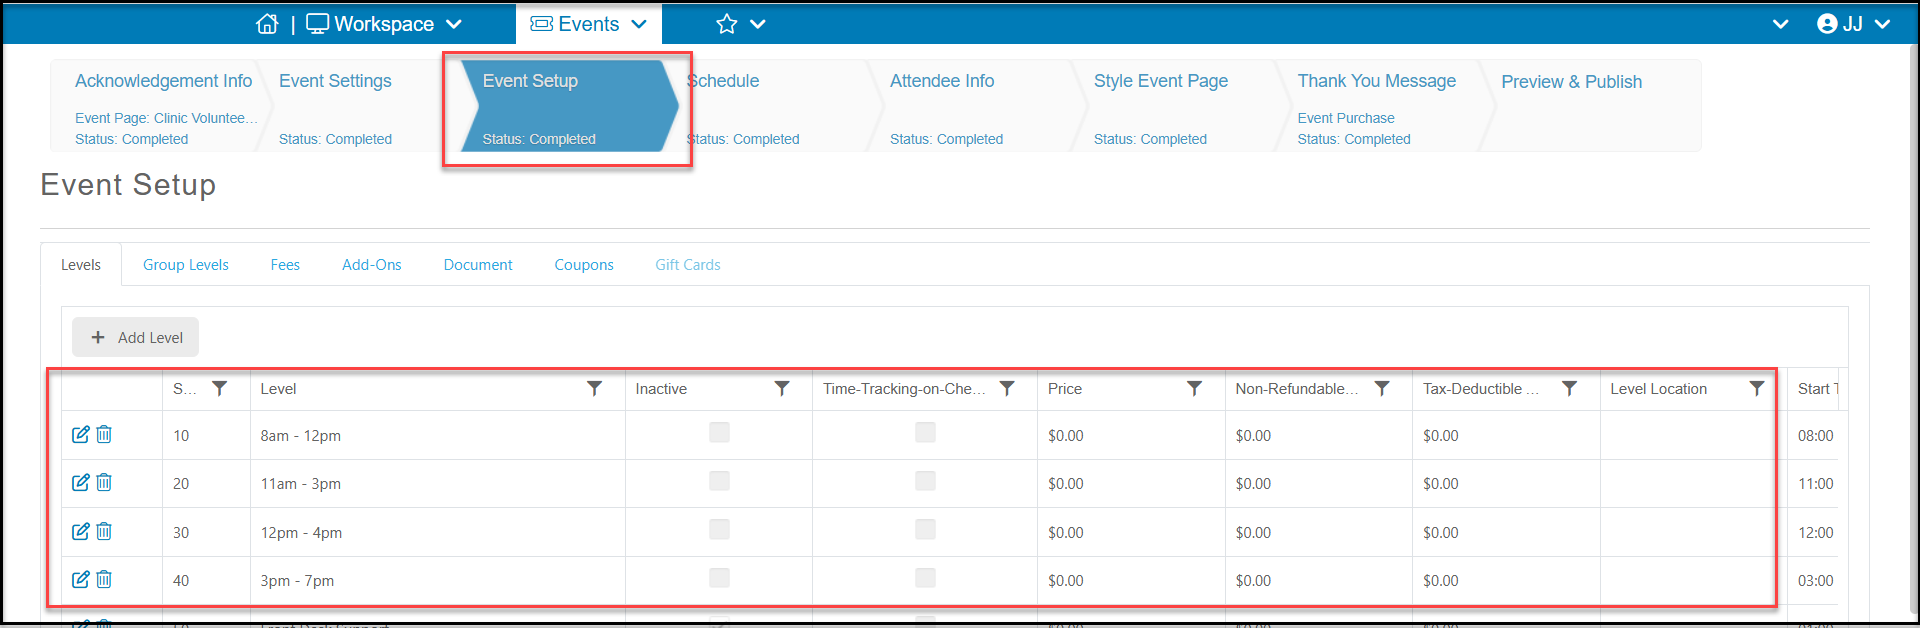
On the Event Setup you will list all the activities and shifts available for your volunteers as event levels. You can add new levels by clicking on +Add Level.
If your activity is for a specific shift or time of day, you can include that information in the name of the level or in the description. Since the name of the level is what appears on the event registration page, making it clear what activity the volunteer is selecting is important.
In our example below, there are several different shifts available on any day, so we added the shift time as the name of the level.
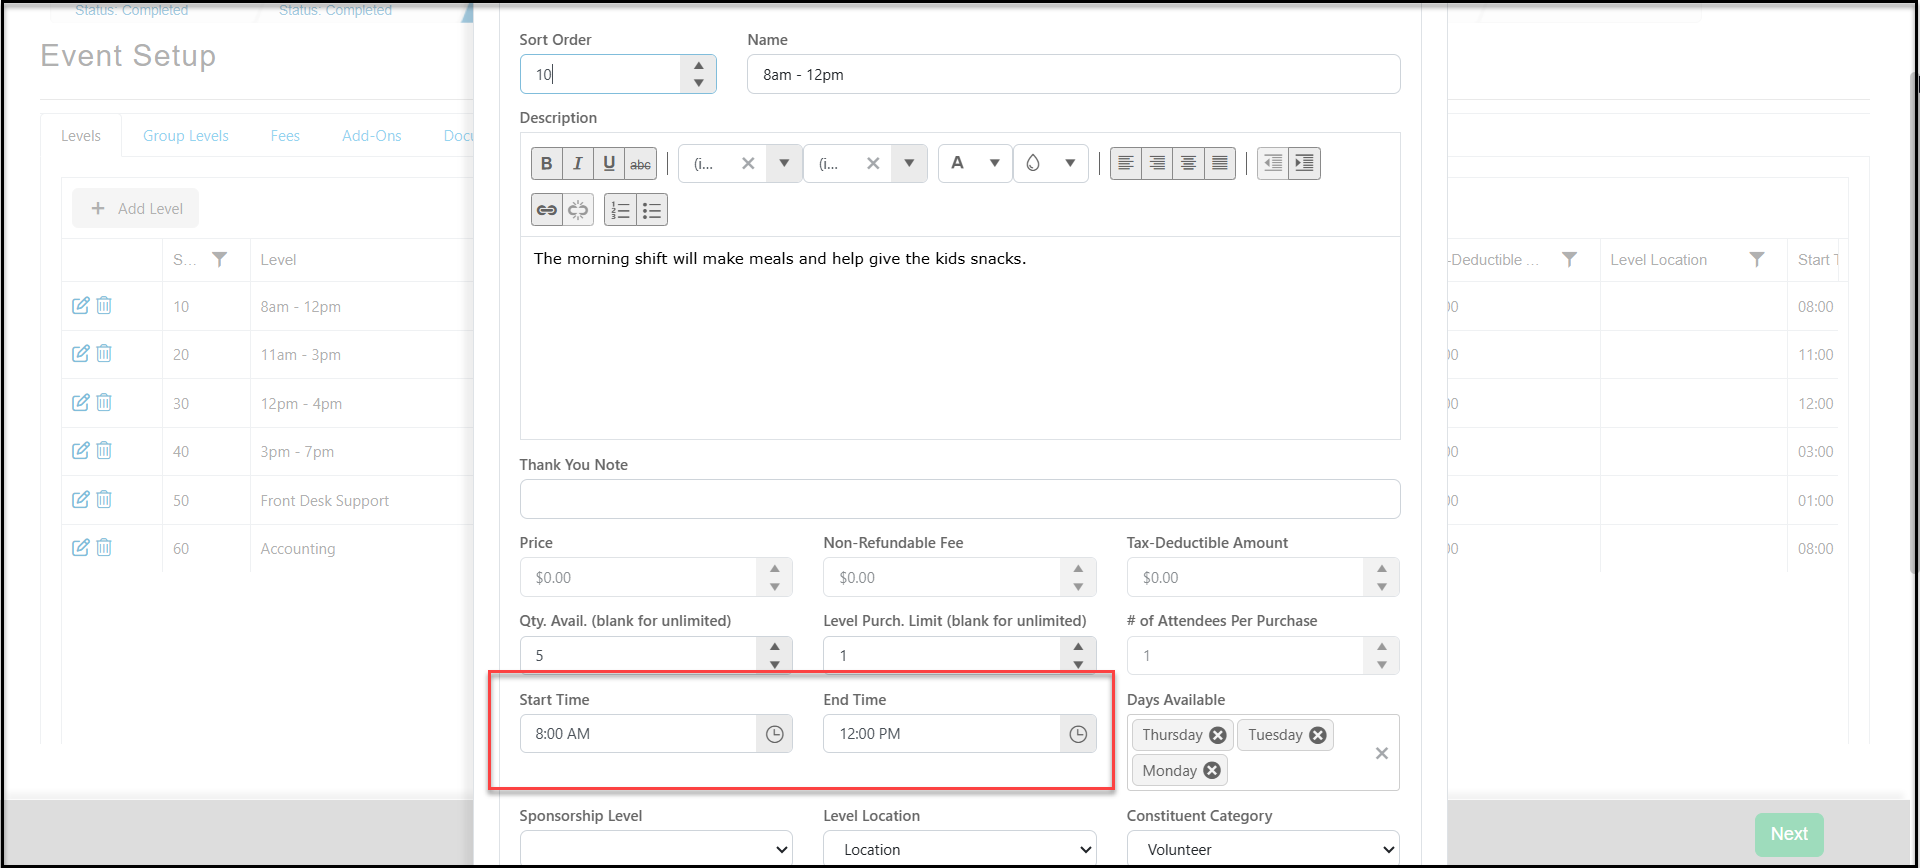
On each event level, you will identify the Start Time and End Time. These fields will be used in the next step to establish tracking defaults as well as showing on the Volunteer Scheduler for each day your event is occuring.
The Days Available will also be necessary if the event is a recurring event, which will be discussed in the article "Creating recurring or multi-day volunteer events"
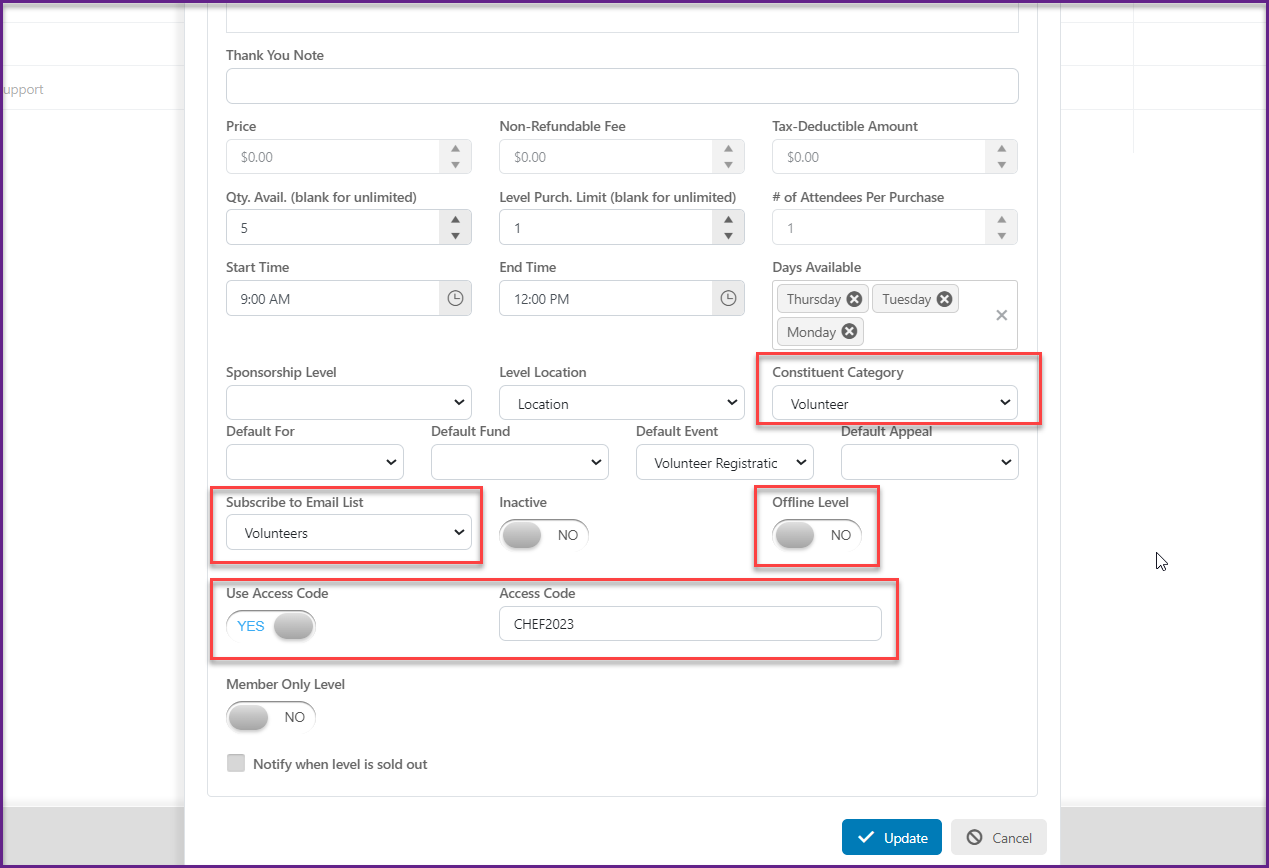
You can also assign volunteers automatically to a Constituent Category and Subscribe to Email List in those fields.
If you want to make a level for internal use only, you can mark it as an Offline Level. It will only be visible to users who are logged in to AssociationSphere for internal use only.
If you would like to restrict who can sign up for a specific level, maybe only those with training for that activity, you could also add an access code by toggling Use Access Code to YES. Constituents will need to know and enter the correct access code to be able to register for that event level.
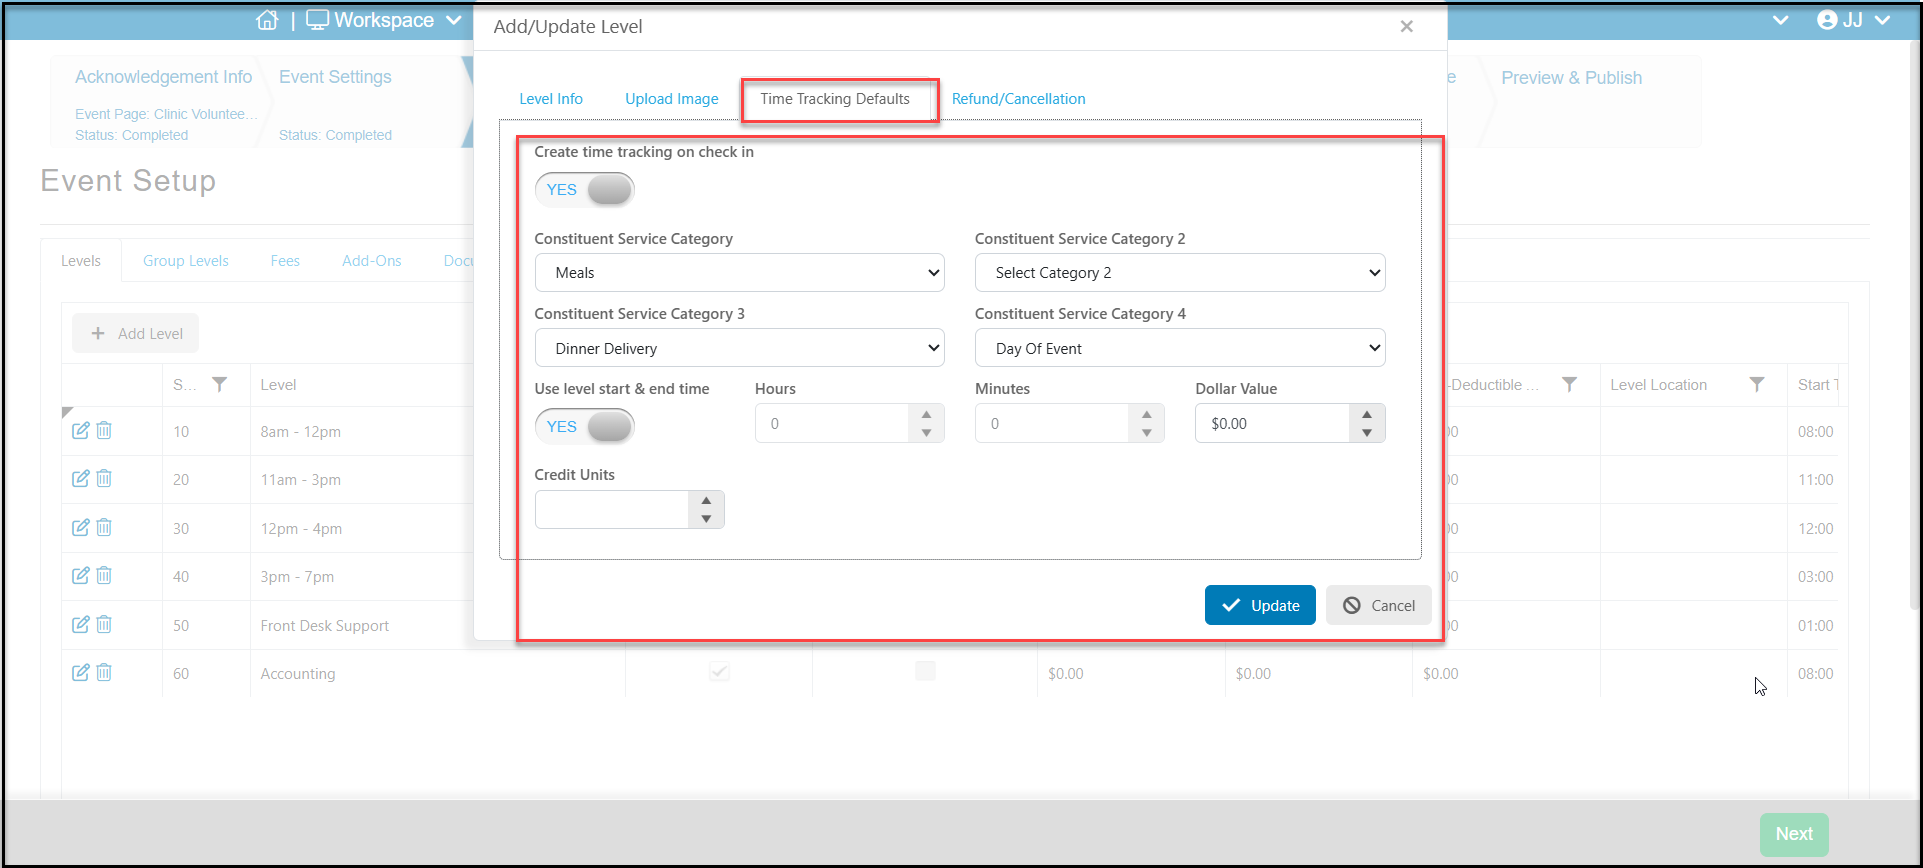
On each event level, you can set the Time Tracking Defaults. This is extremely helpful for automating service time assignments.
- Create time tracking on check in - when set to YES, it will allow you to automate the time tracking information when the volunteer is checked in for the event. This can happen on the Event Attendance grid or Volunteer Attendance grid by checking the column under "In".
- Constituent Service Categories - you can select which Constituent Service Categories will be assigned during check in.
- Use level start & end time
- when set to YES, if you have set up the Start Time and End time in the Level Info, when the volunteer is checked the time assigned for the service will automatically be calculated based on the start and end time.
- when set to NO, you can instead assign Hours and Minutes to be auto-assigned, or you can use the check In and Out boxes on the Event Attendance grid to calculate the time. No time will be assigned if the volunteer is not also checked Out.
- Dollar Value - you can assign a dollar value to the time if desired.
- Credit Units - you can assign credit units to the service time if desired.
Click Update to save your changes.
Event Setup Tab - Documents
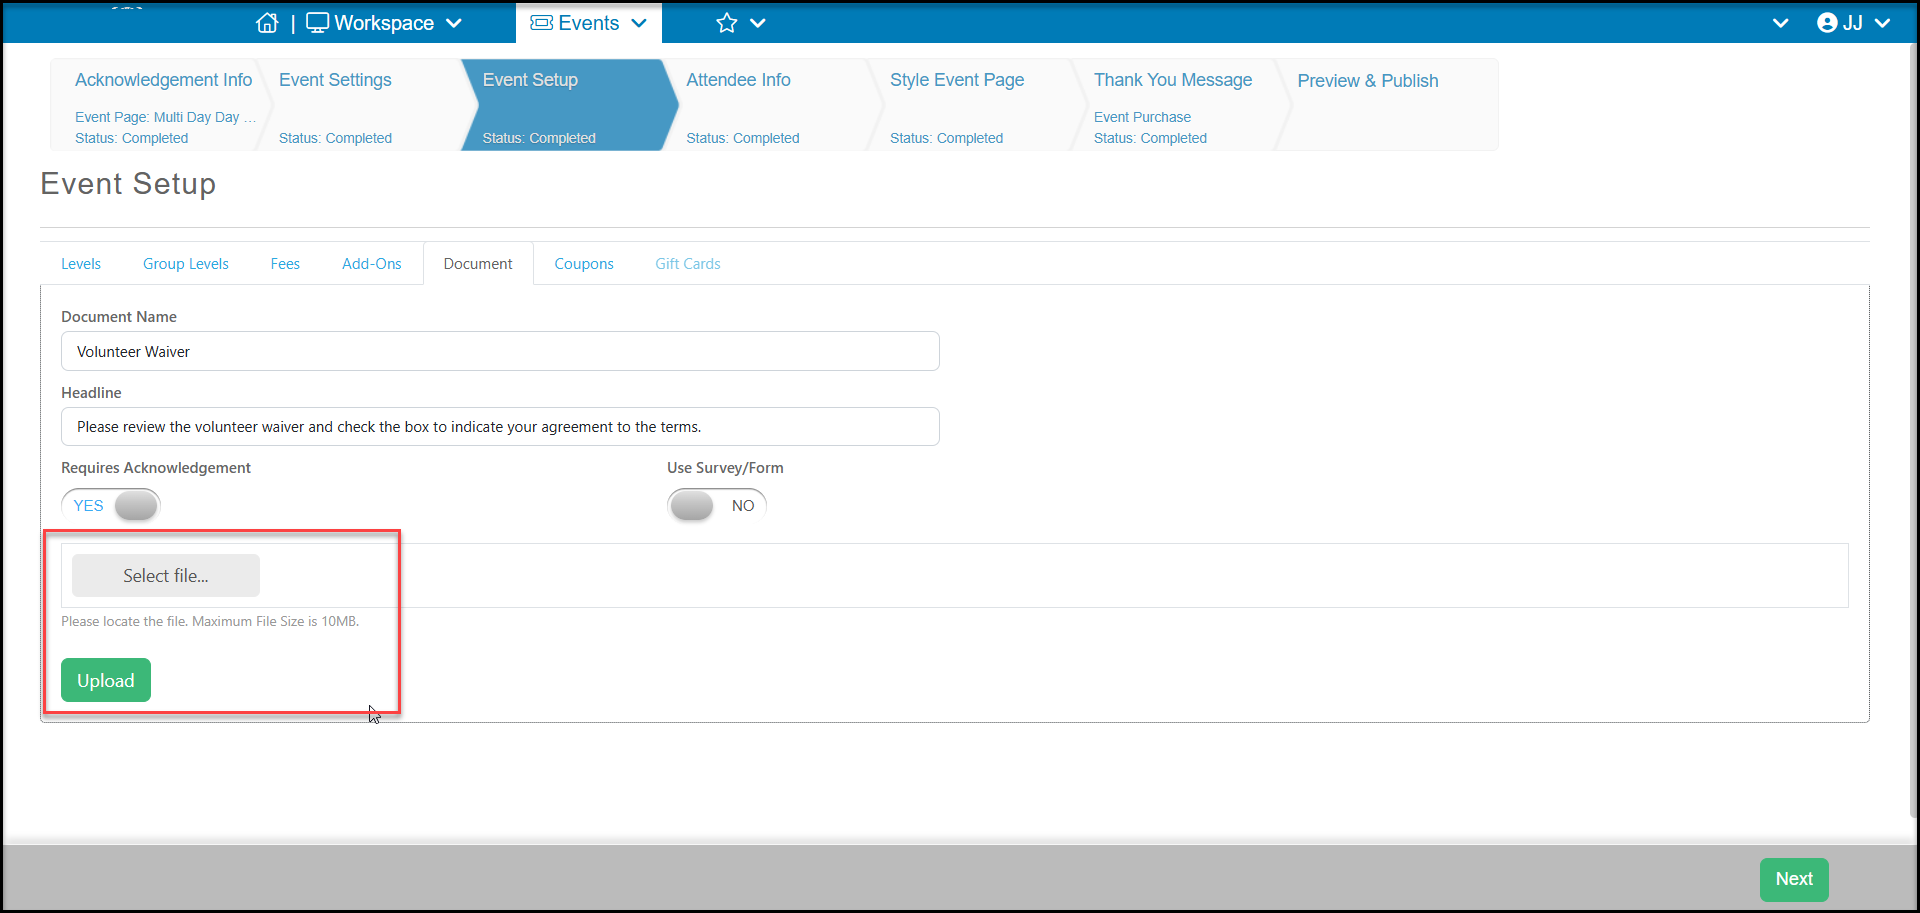
If you need to have your volunteers acknowledge a waiver or review some other document, like a code of conduct, you can add this document to the event registration page under the Document sub-tab.
- You will give your document a name under Document Name.
- Add a Headline or instructions to appear on the page.
- If you want acknowledgment of the document to be required, you can set Requires Acknowledgement to YES. The form cannot be submitted, internally or externally, until this box is checked.
- Click on Select file to choose the file to attach. It should be a PDF file for optimal viewing with all browsers.
- Once the file is selected click Upload to use this document.
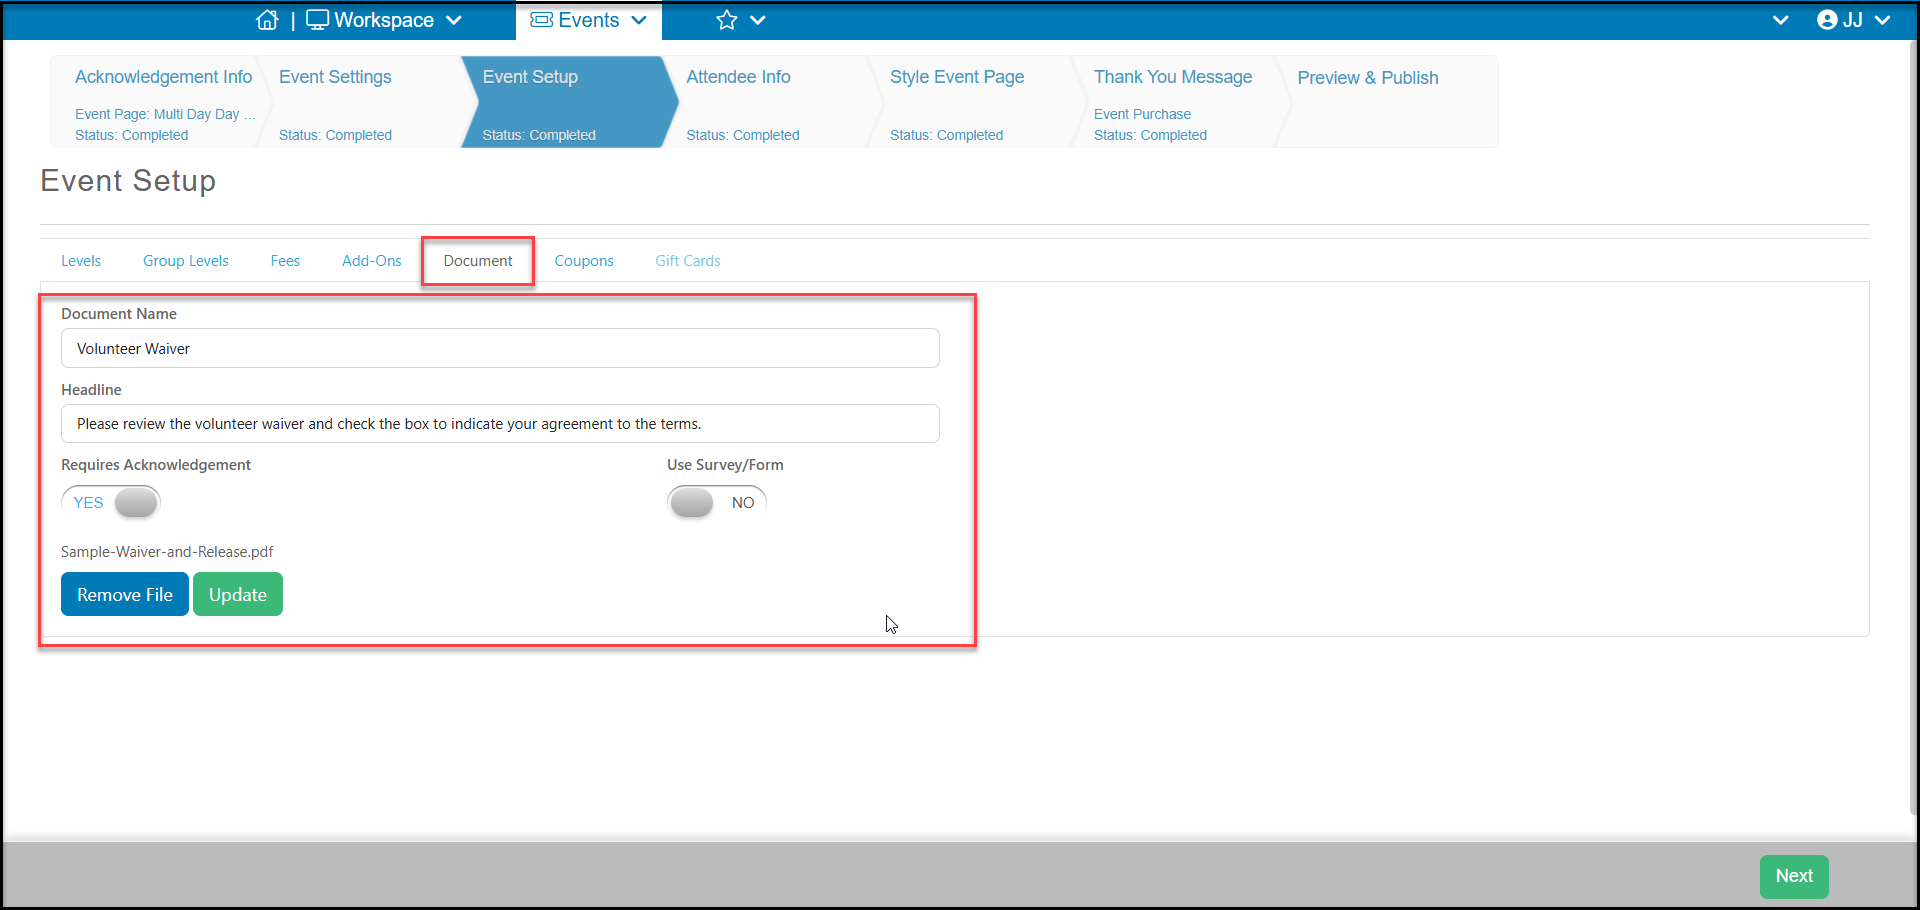
- Once the document is uploaded, if you need to replace it, click on Remove File and select a new file to upload.
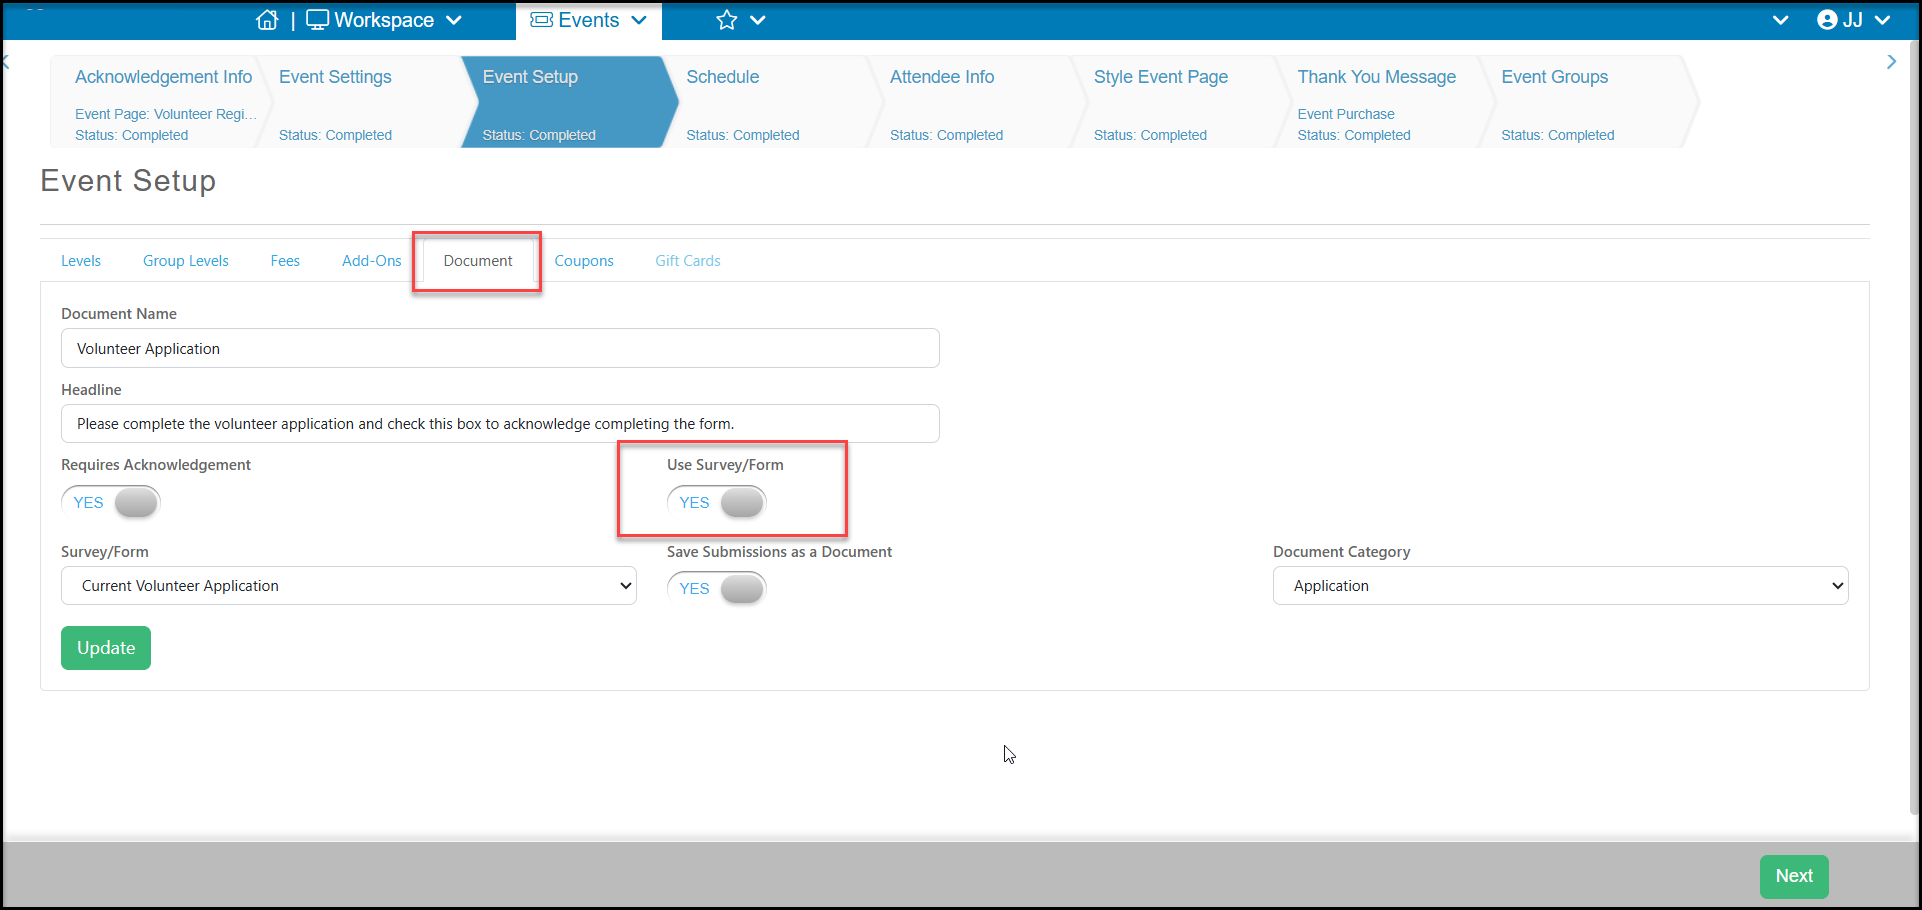
Another option available on the Documents sub-tab is using a survey. Surveys can only link to one constituent. A survey cannot be used to create multiple constituents or update profile information for more than one constituent. By default, the information collected via a survey added to the Document sub-tab will be linked to the constituent completing the registration.
- You will still provide a Document Name and Headline for your survey.
- If desired, you can mark Requires Acknowledgement, however the constituent may not fully complete the survey. Checking the box simply indicates an agreement to the headline.
- Set Use Survey/Form to YES.
- Select which Survey/Form to use from the dropdown list. The survey must already be created to incorporate into the event.
- If you would like to save the survey submission as a PDF document in the constituent's record, you can set Save Submissions as a Document to YES and identify the Document Category to be assigned.
- Note that the PDF document's links to uploaded documents will not function.
- However if you have included document uploads as part of your survey, each uploaded document will be saved as their own document record for that constituent.
- The survey results will be available as a link on the Event Attendance grid as well as in the Surveys/Forms Results grid. the constituent's Survey/Forms tab, and on the Applications grid in the Volunteer Module if the survey was identified as a Volunteer Application.
Attendee Info Tab
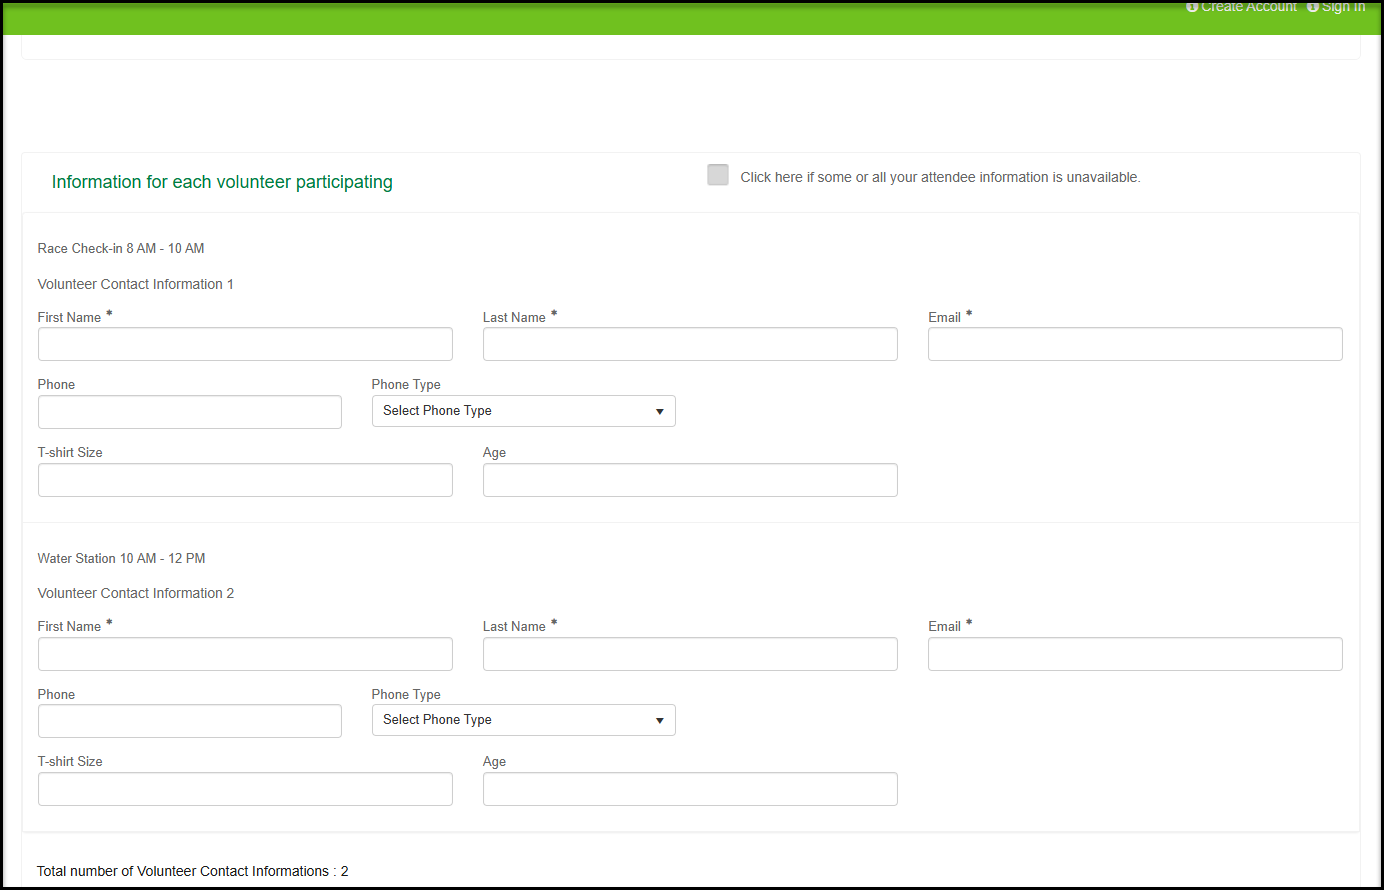
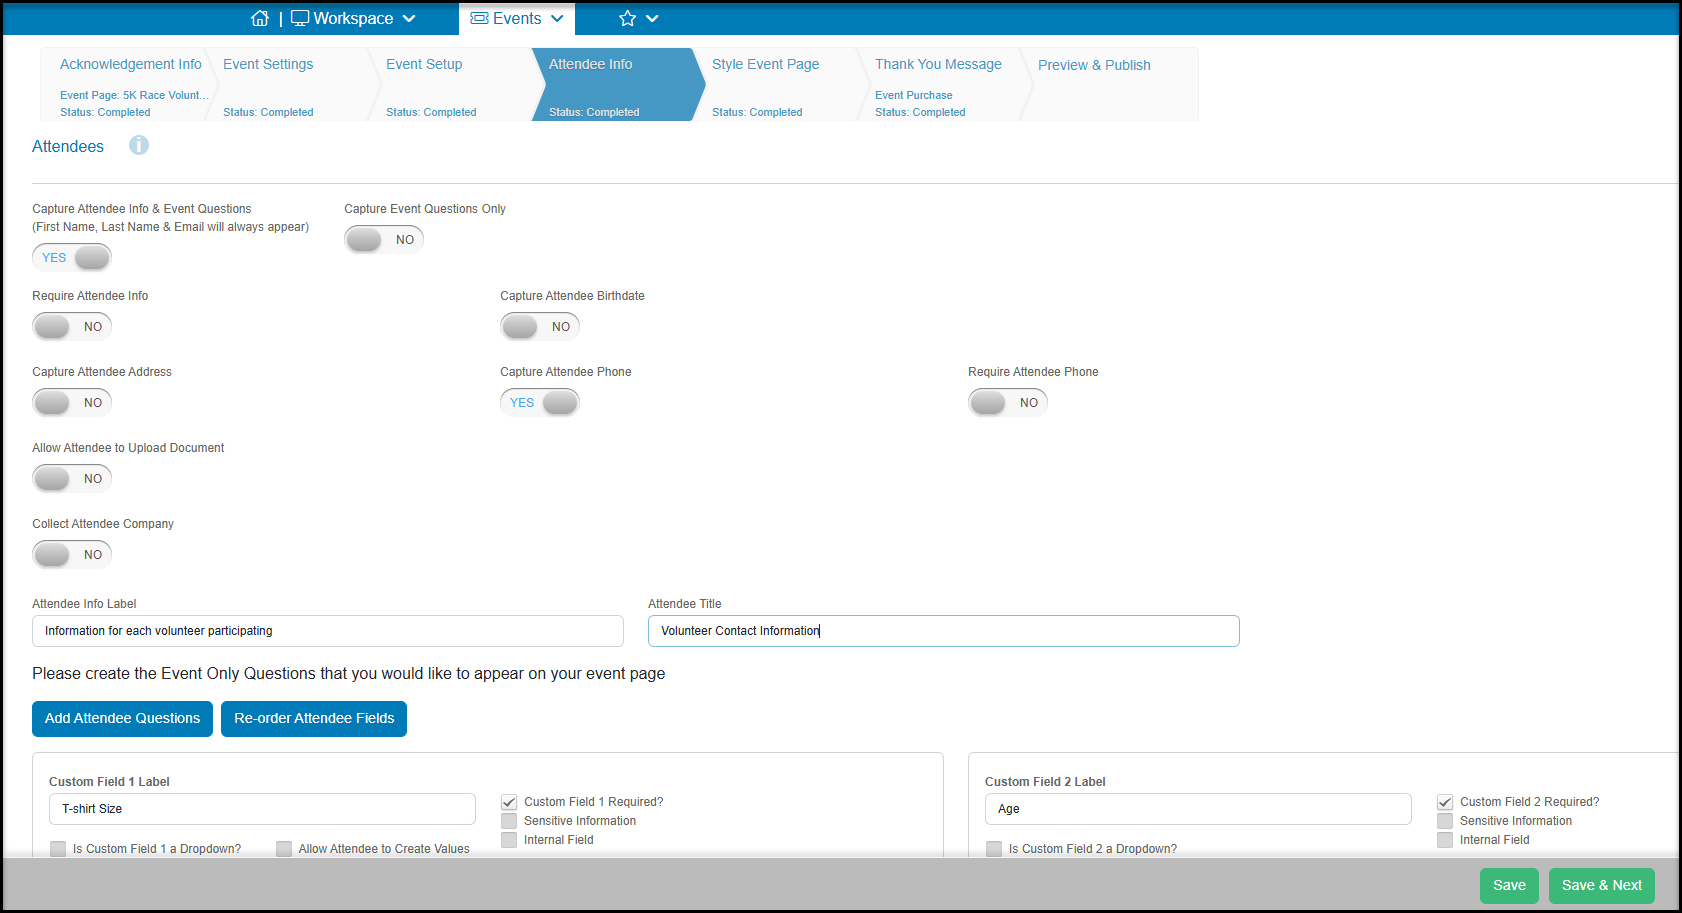
The Attendee Info tab has two options at the top Capture Attendee Info & Event Questions or Capture Event Questions Only. If you do not allow your volunteers to register for others and you do not need to ask any questions of the registrant, you can leave both of these set to NO. The volunteer will always provide their contact information in the registration area at the bottom of the event page.
If you do allow volunteers to register for themselves and others and wish to collect information about each person who will be volunteering, you can set Capture Attendee Info & Events Questions to YES.
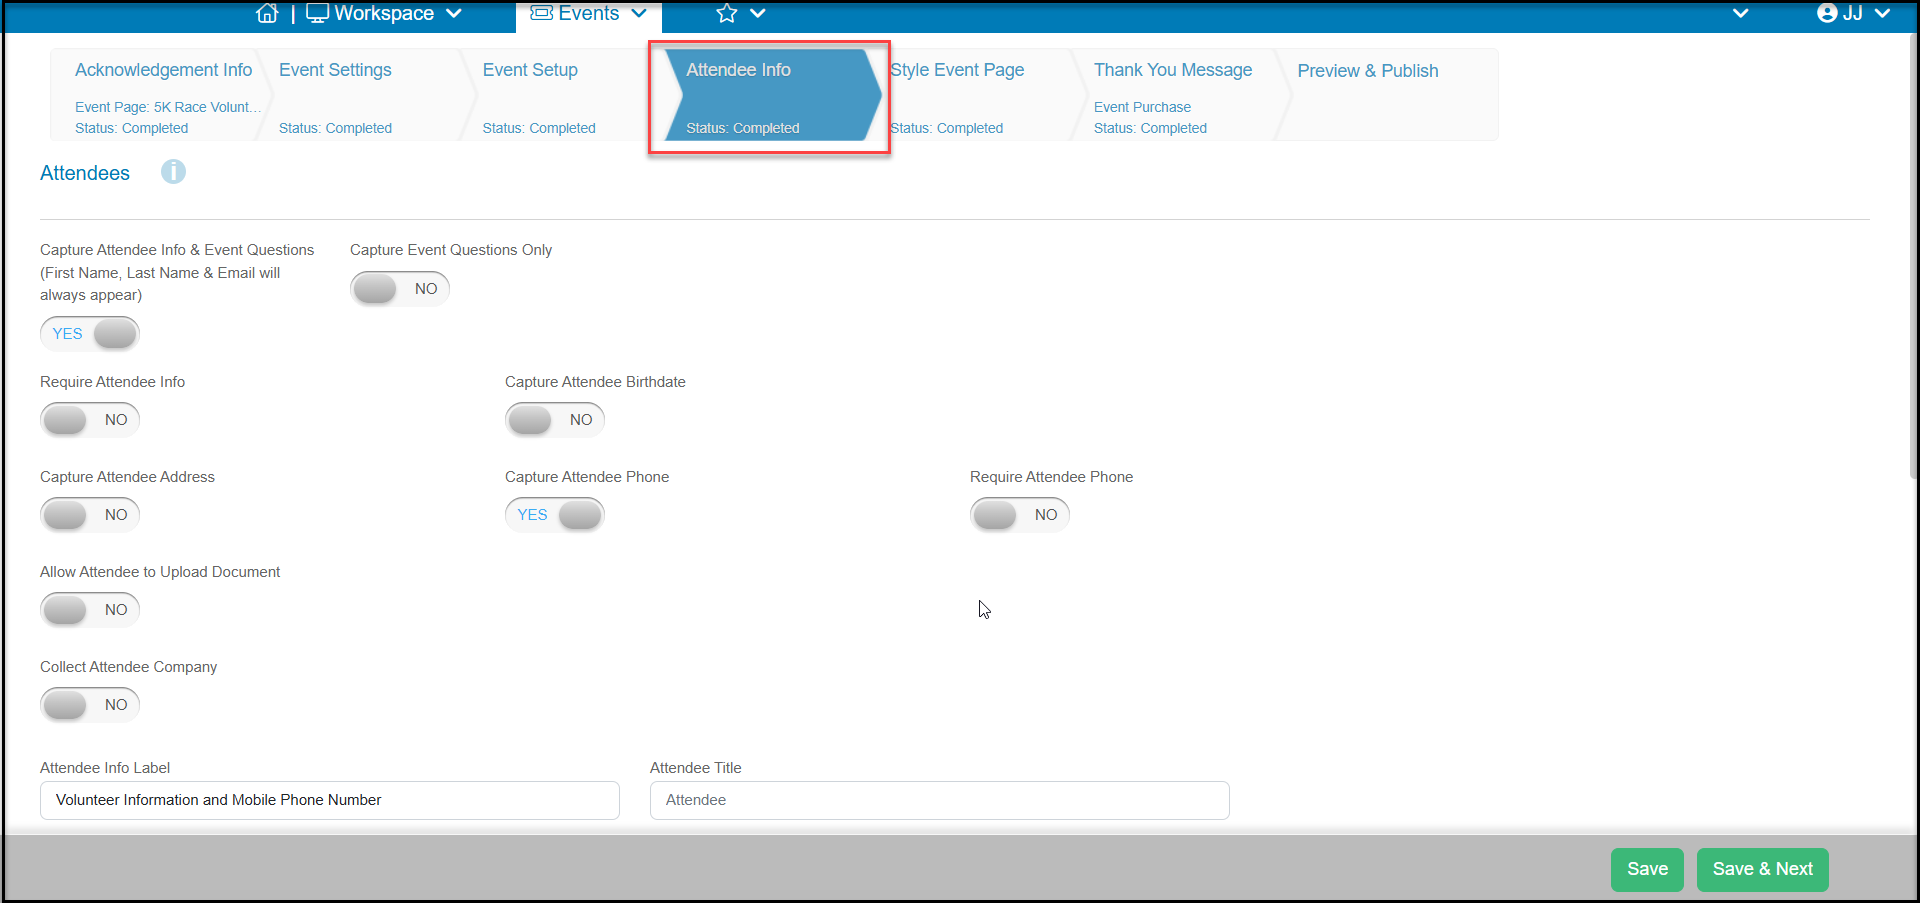
If you do allow registrants to register for themselves as well as other people, you can set Capture Attendee Info to YES and then determine what additional information beyond First Name, Last Name and Email will be collected.
A few things to note:
- When Capture Attendee Info is set to YES, the person completing the registration will need to enter their name and email address twice, once in the Attendee Info area and again at the bottom of the page in the registrant's information area. They will have an option to copy the information entered for one of the attendees as the person registering.
- The software will attempt to match additional attendees to existing constituents using Name and Email. If the software does not find an exact match, it will create a new constituent record.
- If you set Require Attendee Info to YES, the volunteer will be required to complete all the information.
- The more information you require, the more difficult the form is to complete, especially on a mobile device.
- This can lead to volunteers abandoning the form or entering junk information like “TBD” in each field, just to complete the form.
- Each “junk” name provided will become a new constituent in your database.
- If you leave this field set to NO, the registrant will have the option to check a box indicating that all the information is not available.
- If they do not provide the name and email, the registrants own name and email will be used as a placeholder for the Actual Attendee. You will be able to edit this information later on the Attendance grid.
- Using Capture Attendee Birthdate will attempt to match a constituent using birthdate instead of email address.
- If you have not regularly capture birthdate in the past, this may result in duplicate constituent records being created, even if the exact same name and email are used.
- Birthdate matching is usually used when you work with children, since they may not have their own email address.
- You can update the labels for the Attendee Info Label, which appears at the top of the list on the event page, and the Attendee Title, which appears above each volunteer's fields.
- If you need to capture additional information about each attendee, you can also click on Add Attendee Fieldsto create custom questions.
- These questions are linked only to the event and do not update any profile information for the constituent.
- Responses to the Attendee Info Fields can only be found on the Event Attendance or Volunteer Attendance grids.
Thank You Message
The thank you message to defaults to a standard event registration thank you, which includes purchase information. Click on Edit to open the message and remove references to purchases and add any special instructions you would like to share with your volunteers. The thank you message uses the same template editor as is used for email marketing.
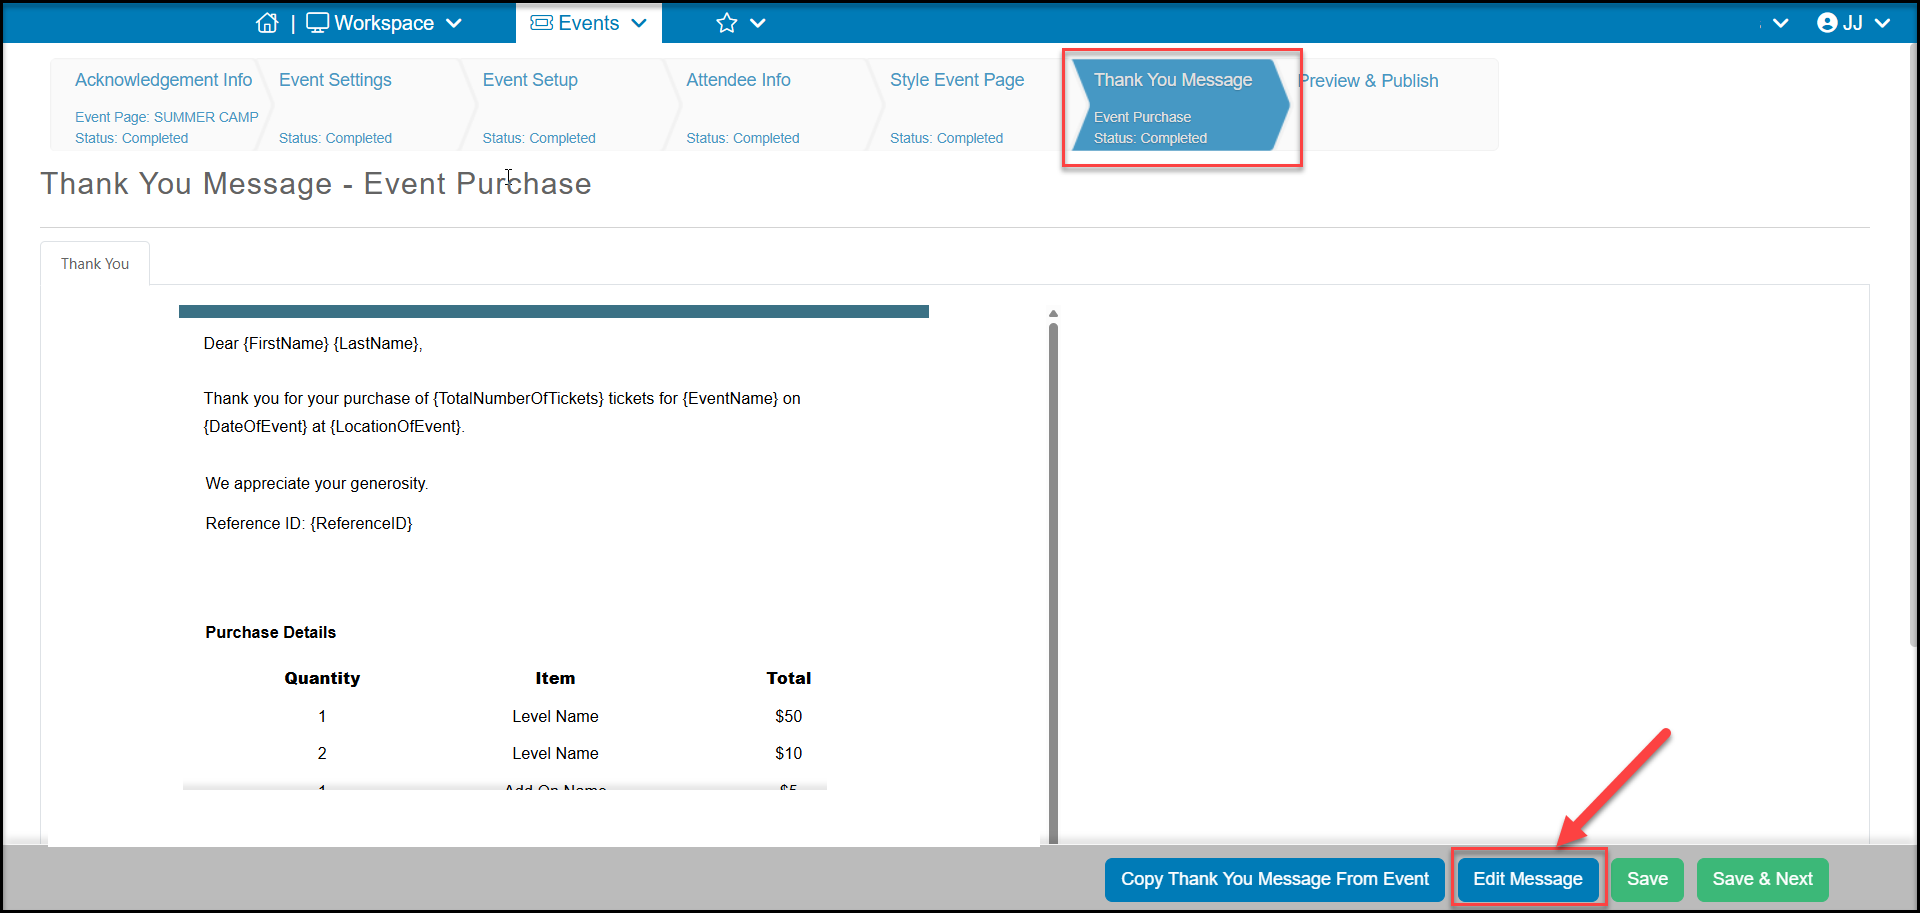
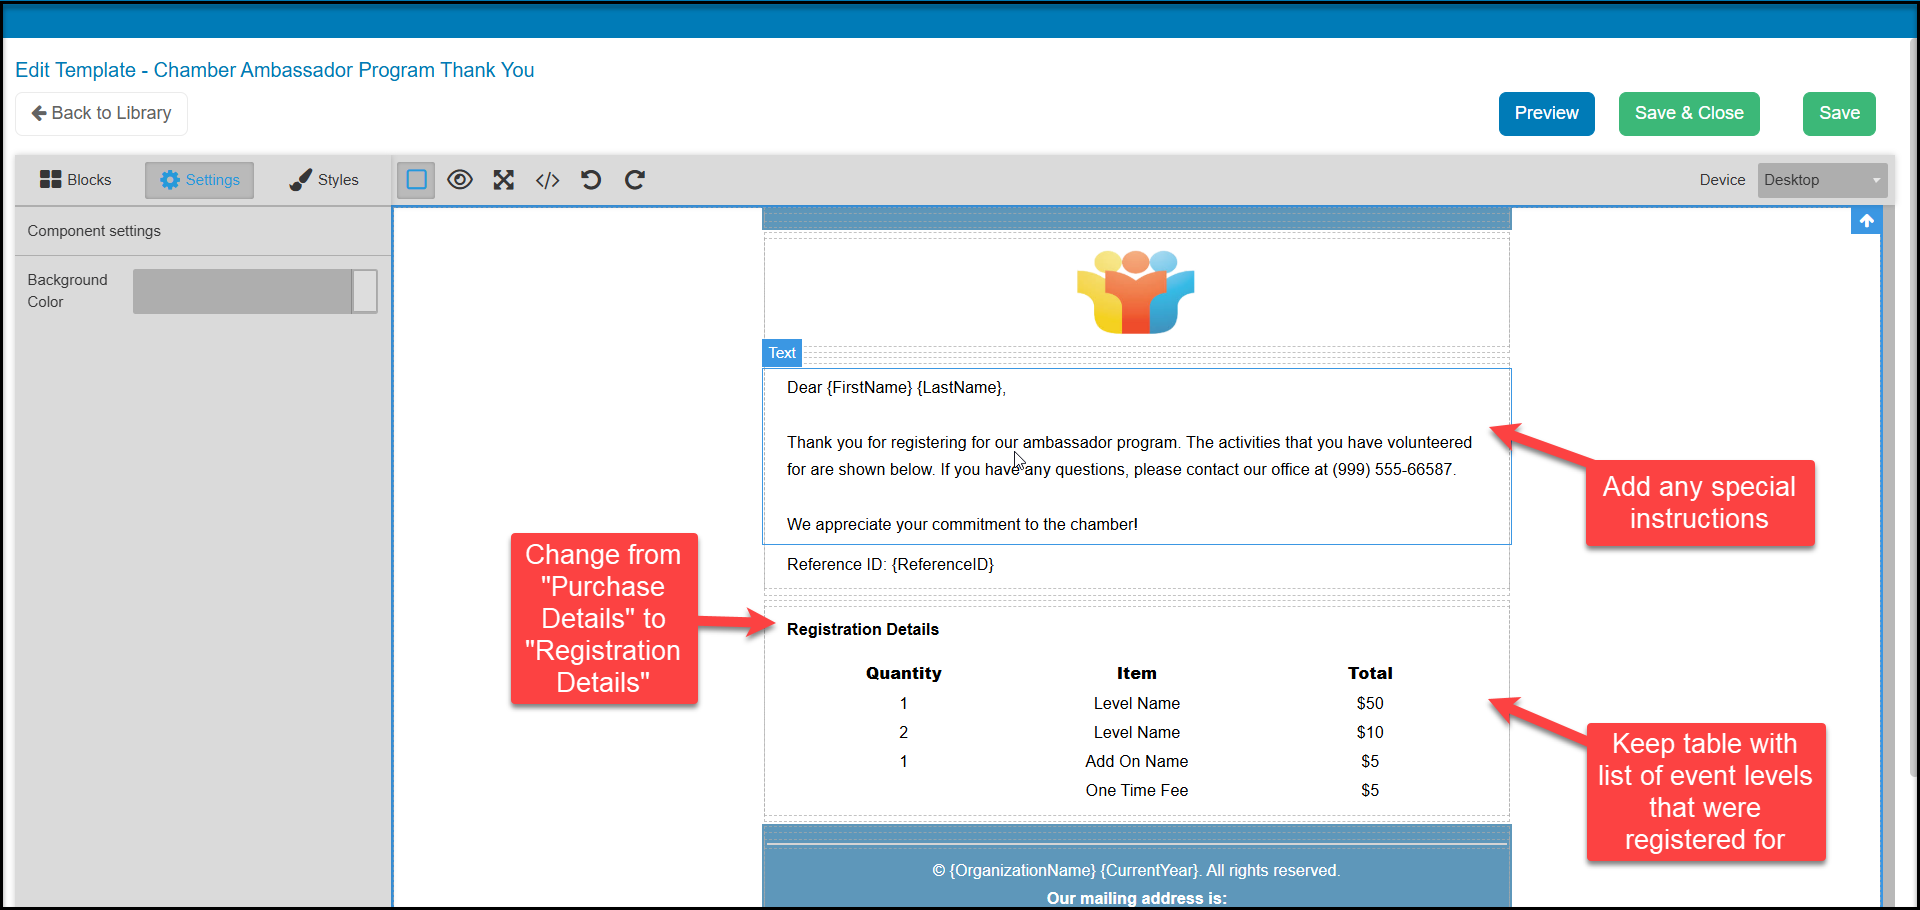
You can change the “Purchase Details” header to “Registration Details” or “Volunteer Activities.” You will want to keep the table as it will show a list of all the activities they registered for.
You can delete the purchase information summary at the bottom of the page, but you will want to keep the table that lists the Quantity, Item and Total. Event though the total column will show as $0, the list will provide the volunteer with a list of all the levels or shifts they registered for.
Click Save & Close to save your changes.
Preview & Publish Tab
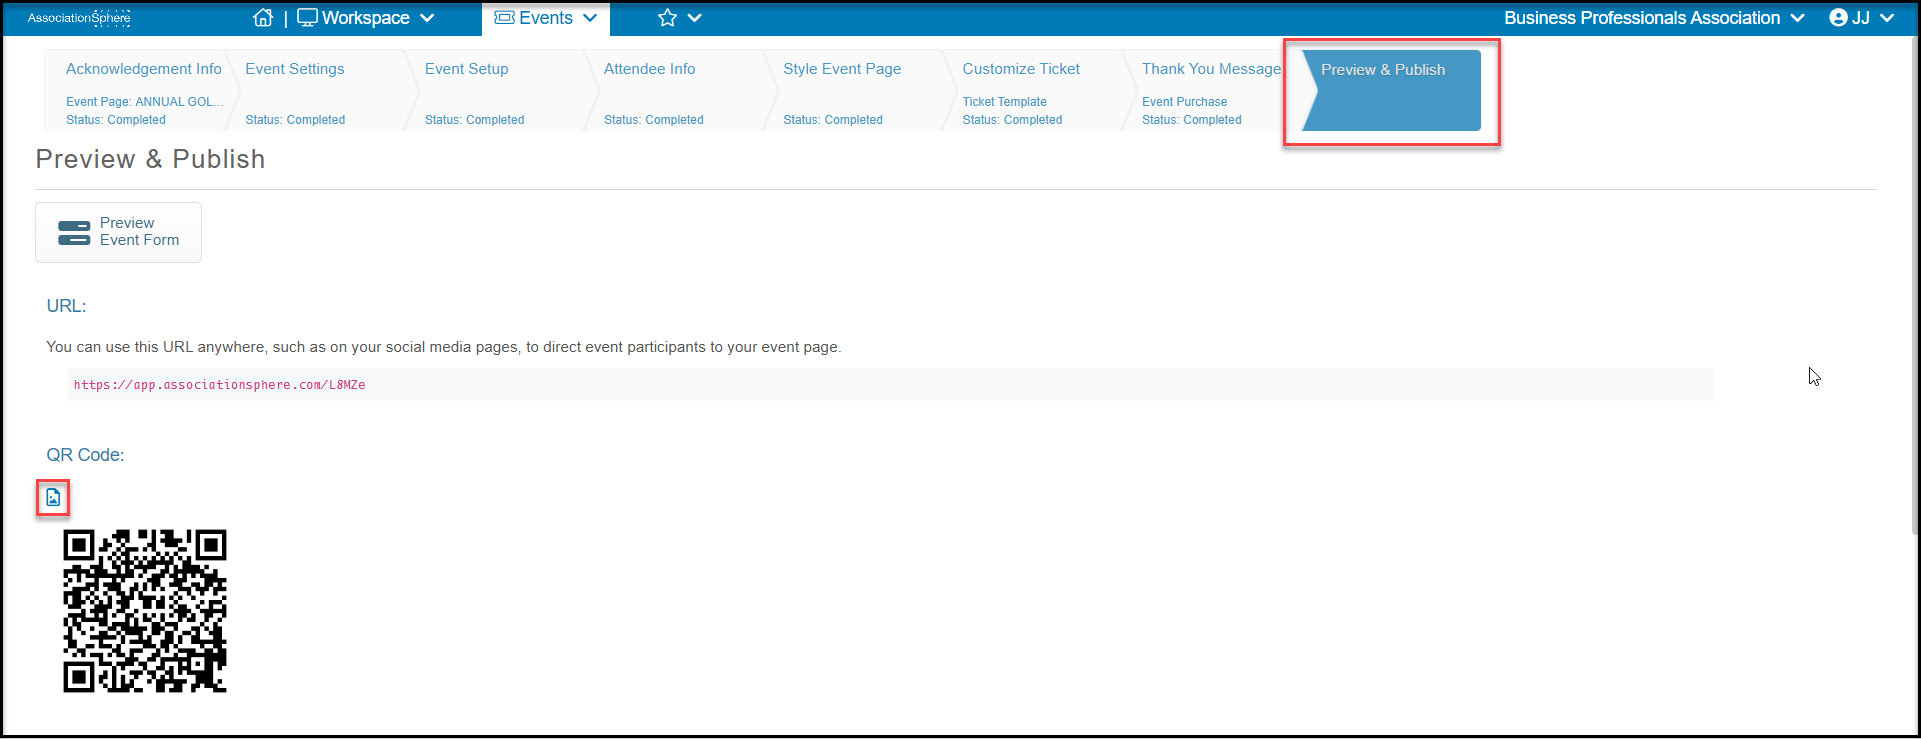
The Preview & Publish tab will provide the URL and QR code you can share for volunteers to register themselves for your event. There will also be an embed code if you would like to add the registration page to your website.
On the event page, the volunteer will be able to choose the activities they wish to register for by selecting the Quantity. Depending on how your page was set up, they may also be asked to complete Attendee Information, authorize a waiver, or submit a survey.